Simply Learn Full-Stack Web, Part 2
June 27, 2022
Simply Learn Full-Stack React & Node.js
Add a form to the React client site
We're going to add a few components here to generate our form from our data. There are much better libraries to do this, which we will look at later, but for now we will write it ourselves.
Create all the following files under the src folder in our React project!
Create Input.js and paste in this code:
1import React, { useEffect, useRef } from "react";23const Input = ({4id, value = "", type = "text", readOnly = false, required = false5}) => {6 const input = useRef(null);78 useEffect(() => {9 if (input.current) {10 const sValue = value.toString();1112 if (type === 'checkbox') {13 input.current.checked = sValue === 'true';14 input.current.value = 'true'15 } else {16 input.current.value = sValue17 }18 }19 }, [type, value])2021 return (22 <input23 ref={input}24 id={id}25 name={id}26 type={type}27 readOnly={readOnly}28 disabled={readOnly}29 required={required}30 />31 );32};3334export default Input;
With
useEffectanduseRefhooks you can be certain that your uncontrolled inputs will update when thevalueprop changes.
Input.js creates text inputs or checkboxes depending on the data type of the value parameter. Next we need a component to render a label with an Input.js.
React has two kinds of inputs: controlled and uncontrolled. With controlled the value is managed by React in
useState. With uncontrolled the value is managed by the DOM. The difference is what the "single source of truth" is. Controlled are ideal when you have a small number of inputs. Uncontrolled perform better and, when your controls are inside a form, it's easier to have a single form event handler rather than an event handler on each input.
Create InputLabel.js, like this:
1import React from "react";2import Input from "./Input";34const InputLabel = ({label, error, info, ...inputProps}) => {5 return (6 <p7 className="input-label"8 >9 <label htmlFor={inputProps.id}>10 {11 label12 }13 </label>14 <Input15 {...inputProps}16 />17 </p>18 );19};2021export default InputLabel;
And now we make a form component with some string utility functions to turn an object into a bunch of form fields using our "Input" components.
Create Form.js:
1import React from 'react';2import InputLabel from "./InputLabel";3import './form.css'45const isNullOrUndefined = prop => prop === null6 || prop === undefined;7const isEmptyString = prop => isNullOrUndefined(prop)8 || prop === '';9const capitalize = word =>10 word.charAt(0).toUpperCase() +11 word.slice(1).toLowerCase();1213function titleFromName(name) {14 if (isEmptyString(name)) {15 return '';16 }1718 return name.split(/(?=[A-Z])|\s/).map(s => capitalize(s)).join(' ')19}2021const Form = ({entity}) => {22 return (23 <form>24 {25 Object.entries(entity).map(([entityKey, entityValue]) => {26 if (entityKey === "id") {27 return <input28 type="hidden"29 name="id"30 key="id"31 value={entityValue}32 />33 } else {34 return <InputLabel35 id={entityKey}36 key={entityKey}37 label={titleFromName(entityKey)}38 type={39 typeof entityValue === "boolean"40 ? "checkbox"41 : "text"42 }43 value={entityValue}44 />45 }46 })47 }48 <button49 type="submit"50 >51 Submit52 </button>53 </form>54 );55};5657export default Form;
And create form.css:
1form {2 padding: 1em;3 background: #f9f9f9;4 border: 1px solid #c1c1c1;5 margin: 2rem auto 0 auto;6 max-width: 600px;7}89form button[type=submit] {10 margin-left: 159px;11}1213.input-label {14 display: flex;15}1617.input-label label {18 font-weight: bold;19}2021.input-label input {22 margin-left: 12px;23}2425@media (min-width: 400px) {26 label {27 text-align: right;28 flex: 1;29 }3031 input,32 button {33 flex: 3;34 }35}
Now change AddEditNote.js to use your Form.js component:
1import React from 'react';2import Form from './Form';34const noteEntity = {5 id: 1,6 title: 'A Note',7 content: 'Lorem ipsum dolor sit amet',8 author: 'neohed',9 lang: 'en',10 isLive: true,11 category: '',12}1314const AddEditNote = () => {15 return (16 <div>17 <Form18 entity={noteEntity}19 />20 </div>21 );22};2324export default AddEditNote;
To test this, inside the node-react-stack/react-client folder, run:
npm run start
You should see an HTML form with the values from the noteEntity object.
Now, to make it easier to see what data our app is using we will make a "debug" component. Create a new file, RenderData.js, like this:
1import React from 'react';2import './render-data.css'34const RenderData = ({data}) => {5 return (6 <div7 className='render-data'8 >9 <pre>10 {11 JSON.stringify(data, null, 3)12 }13 </pre>14 </div>15 );16};1718export default RenderData;
Create render-data.css:
1@import url('https://fonts.googleapis.com/css2?family=Fira+Code&display=swap');23.render-data > pre {4 font-family: 'Fira Code', monospace;5 font-size: 1.2em;6 padding: 8px 0 0 32px;7}
Fira Code is a nice monospace font provided by google. Monospace fonts are ideal for displaying code or data.
And finally, edit AddEditNote.js, like this:
1import React from 'react';2import RenderData from "./RenderData";3import Form from './Form';45const noteEntity = {6 id: 1,7 title: 'A Note',8 content: 'Lorem ipsum dolor sit amet',9 author: 'neohed',10 lang: 'en',11 isLive: true,12 category: '',13}1415const AddEditNote = () => {16 return (17 <div>18 <RenderData19 data={noteEntity}20 />21 <Form22 entity={noteEntity}23 />24 </div>25 );26};2728export default AddEditNote;
If you run the React app now, you should see a screen like this:
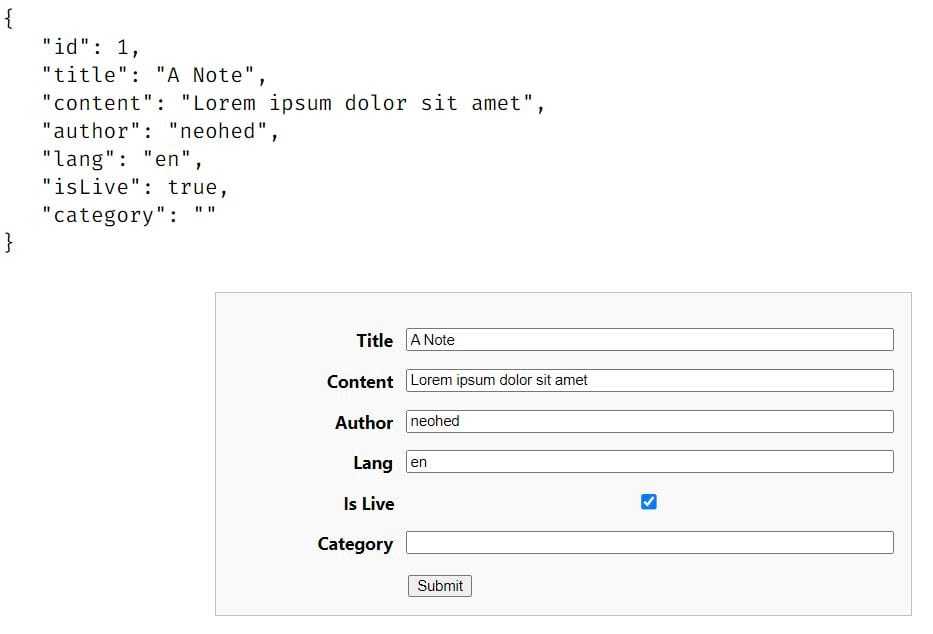
You could just console.log the noteEntity object, but sometimes it's easier to understand things when you use a component like this to render the object in the browser window.
Next we will create the node.js server...
Code repo: Github Repository